
珠宝制作中的电铸是什么?
你是否想过,能将你最爱的自然元素变成独一无二的珠宝?那么,或许是时候探索电铸珠宝制作的世界了。
您很可能之前见过电铸珠宝,却从未意识到。在这些独特的珠宝设计中,原始的金属边缘包裹着宝石和有机材料。
但与任何技术一样,电铸需要技巧、耐心和精确度才能完美。
在珠宝拍卖会上,我们致力于将小型企业联系在一起,发展一个由收藏家和DIY 爱好者组成的社区,他们热衷于手工制作和独特的东西。
您准备好学习如何将您珍爱的小饰品、宝藏和水晶变成您永远不想摘下的独特而又不拘一格的珠宝了吗?
今天,我们将深入研究珠宝制作中的电铸技术,并教您如何创作自己的可穿戴艺术品!
 上图:三颗原始宝石镶嵌在镀银锡电铸戒指上
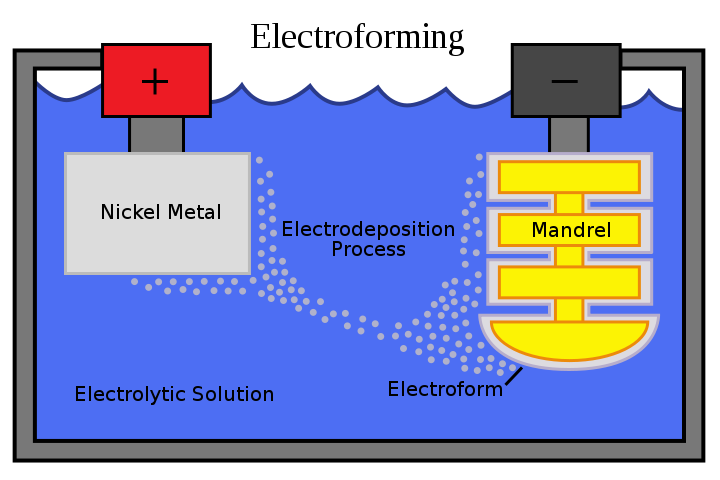
什么是电铸?
电铸工艺是一种将金属镀层到非金属导电基底上的珠宝制作技术。这项创新工艺能够利用天然材料和其他意想不到的媒介,创造出独一无二的珠宝。
这种自由形态的技术需要利用电流在导电表面周围构建金属层(通常是铜)。这种导电表面,或者说“形态”,几乎可以由任何东西制成——蜡、塑料、宝石,甚至是树叶、贝壳、松果等有机材料……不胜枚举。
然后将模具涂上一层导电材料,并浸入金属离子溶液中。通电后,金属离子沉积在模具上,形成一层金属层。
最终产品是一个完美保存的 3D 物体,可以进行清洁、抛光,并作为一件非凡的珠宝佩戴!
至于电铸的强度,你可以重复这个过程来增加厚度和强度。你也可以通过选择不同的金属来增强电铸首饰的强度。
例如,铜相对较软,因此由铜制成的电铸珠宝可能不如由较硬的金属合金(如电铸金或银)制成的珠宝坚固。
那么,您可以电铸哪些金属?
铜电铸
几乎任何金属都可以电铸;然而,铜是电铸珠宝制作中最受欢迎的材料。
在铜电铸过程中,低压电流使铜颗粒从阳极(导电)脱落,并穿过电铸溶液。这些颗粒随后附着在悬浮在溶液中的物体上。
当你使用铜以外的材料进行电铸时,溶液中会悬浮金属颗粒,这些颗粒会附着在工件上。然而,使用铜时,金属颗粒会直接来自阳极(烧杯内的铜线)。
 上图:带盖杯电版画,19 世纪,原作于 1611-12 年之后;材质:电铸铜,镀金;| 图片来源:大都会艺术博物馆
金电铸
如果您要制作电铸金首饰,则需要专门用于沉积黄金的溶液。电铸金首饰可以先制成物品的形状,然后溶解物品本身(例如叶子或模具形状),留下美观轻盈的黄金制成的三维立体效果。
许多珠宝商会将铜电铸与镀金工艺结合使用。铜电铸基底导电性好且富有光泽,能够为镀金或其他高品质金属提供光滑亮泽的基底。
那么这种创新的珠宝制作工艺是如何开始的呢?
电铸珠宝制作的历史
电铸珠宝始于19世纪末。普鲁士裔俄罗斯物理学家莫里茨·赫尔曼·雅各比(Moritz Hermann Jacobi)被认为是该工艺的发明者。
最初,电铸技术在英国、法国和德国主要用于复制雕塑、铜版画和其他艺术作品。
不久之后,欧洲珠宝商开始将电铸技术融入珠宝制作中,并在 20 世纪初得到广泛应用。
多年来,设计师们不断探索新界限,电铸珠宝也得到了进一步发展——可以使用新的金属和独特的媒介。
如今,它仍然是一种流行的珠宝制作技术,具有有机、原始的美感,深受艺术和工作室珠宝商的喜爱。
回到现在,电铸与电镀有何不同?
电铸和电镀是一回事吗?
电铸和电镀是一回事吗?
人们普遍误以为电铸和电镀是一样的。虽然名称和工艺相似,但技术和结果略有不同。
电镀和电铸都需要什么设备?这两种工艺都需要类似的材料:基座、金属、整流器(用于传导电流)、烧杯、电镀液和电源。
显著的区别在于每种工艺的最终产品。电铸工艺会在非金属物品上形成一层厚厚的铜涂层,而电镀工艺则会在另一种金属上添加一层薄薄的金属镀层。
但这是否意味着镀金不是真金呢?从技术上讲,镀层是真金,但由于实际用量很少,镀金首饰的价值不如纯金。
另一方面,电铸工艺是珠宝的主要设计元素。通常情况下,铜是珠宝的主要特征。电镀珠宝涉及各种金属,而电铸工艺主要使用铜。
此外,电铸和电镀可以结合使用。珠宝商可以先进行铜电镀,然后在铜表面电镀新的金属(例如金或银)。
有了这些知识,您准备好尝试电铸珠宝制作了吗?
 上图:镶嵌在铜电铸戒指上的秘鲁粉红蛋白石
如何电铸珠宝
电铸很容易让人感到畏惧。它需要特殊的设备、技术知识、电力和电极——这不禁让人回想起初中科学博览会上的场景。
虽然这听起来像是一个复杂的科学过程,但我们保证,你不需要白大褂或化学学位就能掌握这项技能。事实上,电铸更像是一个有趣的手工项目,而不是一个科学实验!
首先,让我们先了解一下您需要什么。
电铸珠宝制作耗材清单
要开始电铸,您需要收集以下材料:
基本形式
首先,您需要理想的基本形态(如宝石)或想要转化为珠宝的宝藏,如叶子或贝壳 - 无论您心里想要什么!
橡胶手套和护目镜
佩戴合适的橡胶绝缘手套,保护双手免受化学物质和电流的伤害。务必佩戴护目镜,并在清洁、通风良好的区域工作。
铜阳极
接下来,您需要让这些珠宝首饰更具吸引力的关键材料:铜片。
铜电铸溶液
这种液体是一种粘合剂,用于将铜片密封到基座上。
铜线
你需要一根铜线来固定底座,并将其浸入烧杯中进行电铸。22号铜线效果最佳。
3安培整流器
您需要它来为电铸珠宝制作过程提供动力,但最好获得一个可以让您自定义电压和安培的整流器。
漆
这种涂料有助于保护您的有机材料免受电铸溶液的酸性损害。
铜导电漆
您将在想要构建电铸铜的地方涂抹这种金属导电漆。
1,000 毫升烧杯
这个烧杯将容纳溶液、珠宝件和铜线,并作为电铸过程的浴槽。
正极和负极
这些将整流器与铜连接起来。
钳子或镊子
使用钳子或镊子帮助您将物品放入烧杯中。
魔法雕刻(可选)
某些设计需要这种双组分环氧粘土来为您的珠宝首饰制作基础。
 图片来源:Maestro Sargento(原作);Pbroks13(重绘)| Creative Commons Attribution-Share Alike 3.0 Unported 许可证
电铸珠宝制作的准备步骤
物资准备好了吗?准备好了。设计准备好了吗?准备好了。现在,穿上安全装备,我们开始吧!
步骤 1:密封您的基本表格。
首先,用清漆密封宝石(或其他基底),以防止酸损坏。待清漆彻底干燥(约24小时)后再进行下一步。
第 2 步:创建基础。
如果您想让您的珠宝作品带有底座,例如戒指或吊坠,您可以使用双组分环氧粘土来制作。按照产品说明混合树脂和固化剂。制作底座并固定成型件。静置24小时,直到完全硬化。
步骤3:根据需要涂上导电漆。
将导电漆涂在需要电铸的区域。确保彻底搅拌,避免出现条纹或涂抹不均匀。待其干燥一天。
铜导电漆区域必须相互连接,否则,部件的某些部分会暴露在外而没有铜板。
步骤 4:将作品悬挂在烧杯中。
将已完全干燥的涂漆作品放入空的玻璃烧杯中。用铜线缠绕作品以防止其掉落,但不要完全覆盖导电的铜漆。用钳子将铜线缠绕,然后滑入烧杯中。
 图片来源: 大英百科全书
电铸步骤
步骤5:应用铜阳极。
清洁铜阳极(或铜片)后,在顶部的两根铜条上钻孔,并将它们连接到新的铜线上(不是缠绕在底座上的那根)。然后,将它们放入烧杯中。
就上下文而言,这根新的铜线就是用来连接正电源的,而底座周围的电线则将金属离子沉积到底座的表面上。
步骤6:添加电铸溶液。
将溶液慢慢倒入烧杯中,直到物品完全浸没。
步骤 7:剪断导线。
关闭整流器后,将负极(黑色)线连接到阴极,将红线(正极)线连接到阳极。
步骤 8:通电!
将整流器设置为0.1,这样每平方英寸表面的电压为0.1。30分钟后,检查是否需要调整安培数。放置10到24小时。
最后一步:取下、抛光、佩戴!
当您的物品达到所需厚度时,关闭整流器,松开引线,并从溶液中取出物品。
用水冲洗您的珠宝并抛光以增强铜的光泽。
现在您可以佩戴一些真正独特的电铸珠宝了!
就这样!不吓人,也不危险,只要练习一下,你很快就能掌握电铸珠宝制作的技巧!
 上图:原始烟晶水晶吊坠,镶嵌在镀金电铸铜中
珠宝电铸的益处
如果您仍然不确定是否要学习如何电铸,这些好处可能会改变您的想法。
那么电铸在珠宝设计中有什么好处呢?
您可以创造美丽、高品质的珠宝和可穿戴的艺术品。
最终产品将具有更高的一致性和精确度。
这样做的人并不多,因此这是一种罕见且独特的珠宝制作技术。
电铸珠宝可以使用很多年,因为它非常耐用。
电铸是一种环保的生产工艺。
另一方面……
电铸的局限性
以下是一些值得注意的缺点:
启动所需的设备和材料成本可能很高。
这是一个耗时的过程,需要很大的耐心。
存在损坏精密基材的风险。
要完美地制作电铸珠宝需要不断练习。
电铸珠宝有时会失去光泽,因为它是由铜制成的。
觉得我们可能遗漏了什么?我们的常见问题解答部分可以解答您的疑问。
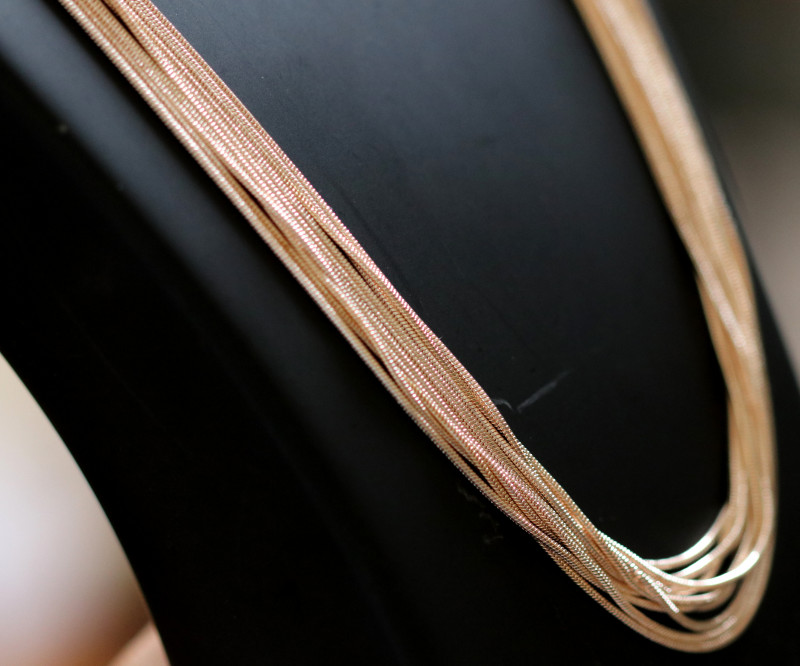 上图:十条由电铸不锈钢制成的镀玫瑰金蛇链项链
常见问题
下面,我们回答了一些有关电铸珠宝的最常见问题:
电铸是如何工作的?
电铸的工作原理是将导电材料放入含有金属颗粒的溶液(电解液)中,并在溶液中通入电流。电流使金属颗粒粘附在导电材料上,从而在物体周围形成金属层。
电铸金是真金吗?
是的。电铸金的金层通常比纯金薄,但电铸金是真正的金。不过,电镀金比电铸金更常见。
电铸金与镀金或包金珠宝有何不同?
电铸金通常是珠宝的主要部分——在物体周围镀上一层厚厚的金,金子一旦镶嵌上去,通常会溶解。镀金的过程类似,但它会在金属物体上镀上一层较薄的金,通常用于装饰目的。
包金珠宝涉及完全不同的加热和加压工艺;金层通常比电铸金和镀金珠宝的金层更厚。
电铸一枚戒指或吊坠需要多长时间?
视情况而定!电铸过程需要几个小时到几天的时间,具体取决于您希望珠宝的涂层厚度。
电铸是否可持续?
电铸被认为是一种可持续的做法,因为您可以将旧物品或宝石回收利用成珠宝(而不是将其扔掉)。
什么是 24k 金电铸?
24K金电铸是一种特殊的技术,可以提高24K金首饰的硬度和耐磨性。您也可以用它来替代典型的电铸工艺中的铜溶液。
什么是14K金电铸?
14k 金电铸是指用 14k 金替代铜溶液,从而制造出更坚固、更耐用、更有价值的珠宝首饰。
电铸珠宝耐用吗?
是的,电铸珠宝(尤其是铜或金电铸珠宝)非常耐用,只要保养得当,可以经久耐用,经久耐用。有些珠宝商会添加一层保护涂层,使电铸珠宝更易于保养。
我该如何保养电铸珠宝?
最好像对待其他精致珠宝一样对待电铸珠宝。以下是一些关键的电铸珠宝保养技巧:
游泳、洗澡或进行任何剧烈活动前请取下首饰
避免珠宝接触刺激性化学品或清洁剂
存放在阴凉、黑暗的地方,避免潮湿和长时间阳光照射
定期清洁和抛光电铸珠宝,以保持其光泽
 上图:原始晶簇宝石镶嵌在镀银电铸锡戒指上
利用电铸珠宝制作技术保存您的珍宝
电铸工艺将宝石和有机材料完美融合,创造出非凡的珠宝作品,这真是令人着迷。毕竟,还有什么比将你心爱的珍宝转化为独一无二的可穿戴艺术品更好的保存方式呢?
只要有一点耐心、练习和丰富的想象力,你就可以通过电铸珠宝制作创造出无数独特的珠宝。
如果你不想培养新的爱好,别担心!我们为你准备了精美的电铸首饰,随时可以成为你的收藏品!


搜索Fashion Encyclopedia