
发布时间23rd Jul 2020
修改于14th Sep 2024
如何准备珠宝制作用的焊料
 制作珠宝是一项令人兴奋的冒险——无论您是珠宝制作爱好者还是拥有专业工作室。焊接是珠宝设计师和工匠使用的最常见技术之一。毋庸置疑,焊接知识对每个珠宝制造商都至关重要。在本指南中,我们将引导您完成准备焊料的步骤。
掌握这些步骤后,您将能够连接金属并突破创造力的界限。第一步?让我们解构焊接的基础知识并为您指引方向!
什么是焊接?
简而言之,焊接是将两种不同的金属连接或熔合在一起的过程。珠宝制造商使用焊接将金属连接在一起并形成复杂而独特的设计。
焊料是一种由铅和锡制成的材料。焊接是使用焊料通过热量和铁将金属熔化的过程。
那么,您知道了这个过程,现在该怎么做呢?以下是如何准备用于珠宝制作的焊料。
珠宝焊接工具和材料
焊接珠宝的第一步是准备好所需的所有材料和工具。除了设置安全空间外,您还需要以下物品:
焊锡片或焊锡线(软、中、硬)
木炭块、窑砖或陶瓷块
焊锡镐
喷灯(最好是 Microflame 丁烷)
镊子、钳子和钳子
水杯或水罐
助焊剂或焊膏
泡菜锅
除了这些珠宝焊接工具外,您还需要注意设置一个安全且通风良好的工作空间。务必在防火表面上工作,戴上安全眼镜,随身携带灭火器并将头发扎起来。您还必须穿天然衣服,因为合成材料可能会引起火灾。您的工作空间中已经准备好了所有材料,现在让我们来谈谈如何准备焊料!
将焊料擀薄(或用锤子敲薄)
为了开始焊接珠宝,你必须把焊料弄得又好又薄。这样做会使焊料更容易切割并最大限度地利用你的材料。有两种方法可以做到这一点:用锤子或通过轧机。
使用滚轧机:将焊料以垂直角度送入滚轮。送入后,焊料会变平。
如果您没有轧机:用锤子将焊料锤平放在钢制工作台上。您可以用锤子将焊料锤平,而不是通过轧机轧平。将一侧锤平后,将其翻转并锤打另一侧,这样可以得到一个漂亮、平整、薄而均匀的表面。
您将使用各种焊料,尤其是易焊、中焊和硬焊。焊接时,很难知道您正在使用哪种焊料,因为它们看起来差不多。我们有解决方案!
组织你的焊料
如果您要使用多种焊料等级,请用记号笔对它们进行颜色编码,以保持条理清晰。选择三种颜色,并将每种颜色与一种焊料等级相关联。如果您看到红色焊料片并立即知道红色代表硬焊料,事情就会变得容易得多。
或者,如果您希望保持中立,请在工作台上用小隔间将焊料分开。使用标签机识别每个焊料,并在工作时轻松抓取焊料。
以上就是如何准备焊料的内容,让我们看看实际的焊接过程!
如何准备焊料并开始使用它
现在您已经准备好了——这里有一些关于如何焊接珠宝金属的快速提示。
组织你的工作空间
组织是高效珠宝制作的关键!随着工艺的不断精进,您自然会积累材料和工具。为焊料、轧机、锤子、珠宝金属、钳子、助焊剂和您使用的其他任何工具创建一个指定区域。如果这些物品在您的工作区四处散落,您将浪费时间寻找它们。 
清洁并准备材料
在开始焊接之前,请确保您的材料(和手)没有油脂。一个好方法是将 材料放入腌制锅中清洗几分钟。一旦材料干净整洁,使用钳子或钳子将金属轻轻地放在砖块上。
使用 Flux
材料都摆放整齐了吗?太棒了!现在你可以把焊料切成小块了。是时候加入助焊剂了!有两种方法可以完成这一步:
使用画笔将助焊剂涂抹到计划焊接的区域
- 使用细刷涂抹助焊剂糊(如硼砂),然后加热金属,再添加焊料
添加焊料
使用小镊子将小块焊料涂抹到金属上。你真的不需要涂抹太多焊料,但一开始,你可能需要尝试学习这项技术。
点燃火炬
现在是时候让火焰加热焊料和金属,将它们粘合在一起了。您可能会想到自然地直接对焊料加热,但这实际上会对您不利。更好的方法是让火焰吸引焊料,这将使焊料流过。一旦发生这种情况,请移开焊枪。 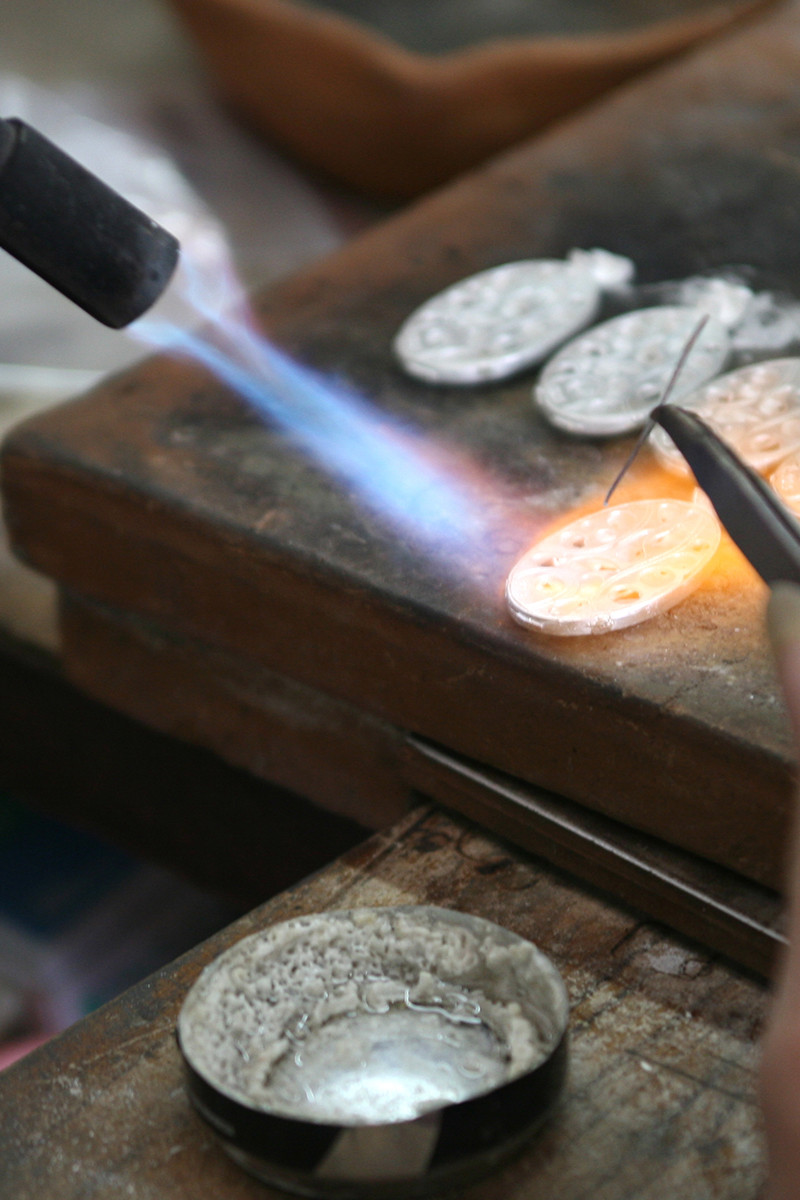
浇灌焊料
用钳子夹住金属,将其浸入水中冷却。在许多情况下,您必须焊接金属几次。如果发生这种情况,请不要担心,这是过程的一部分。唯一要记住的是,您必须将焊料换成软焊料或中焊料,以获得正确的固定效果。
就是这样!你正在成为焊接大师的路上!似乎有很多东西需要掌握?别担心,作为初学者,焊接可能感觉像是一种令人生畏的技术。就像所有新的爱好一样:熟能生巧!熟练之后,你将有信心做出大胆的设计,并在创造力中蓬勃发展。
购买珠宝


搜索Fashion Encyclopedia