
發佈於28th Jul 2020
修改於22nd Feb 2021
Akwankyerɛ a Wɔde Di Dwuma a Wɔde Thermoplastic Di Dwuma De Si Abo
 Nnwinnade, nneɛma nketenkete, ne nneɛma ahorow nyinaa wɔ agude a wɔyɛ wiase no mu. Sɛ wopɛ sɛ wode w’adwinni anisoadehu ahorow ba nkwa mu a — wubehia nneɛma a ɛbɛboa wo. Wɔ akwankyerɛ yi mu no, wubesua ahokokwaw bi a ɛho hia wɔ agude a wɔyɛ mu: sɛnea wɔde thermoplastic bedi dwuma de asi abo.
Dɛn na wɔde thermoplastic di dwuma? Wiɛ, agude yɛfo pii de aboɔden abo ne nhwiren ahorow na ɛyɛ adwuma. Thermoplastic ma wɔn a wɔyɛ agude tumi de saa nneɛma nketenkete a wɔde siesie fie yi hyɛ agude asinasin mu yiye.
Thermoplastic yɛ adwuma sɛ ade a wɔde nkata so, ɛkame ayɛ sɛ te sɛ gluu, de kura w’agude no mu ma ɛkyekyere aboɔden abo. Nea ɛnte sɛ gluu no, ɛnyɛ den sɛ wubeyi saa polymer yi afi wo adwini no mu.
Sɛnea wubetumi ahu no, agude yɛfo biara kit a edi mũ a thermoplastic nka ho. Sɛ wontee thermoplastic ho asɛm, anaasɛ edin no ankasa te sɛ nea ɛyɛ hu a, yɛbɛkyerɛ wo sɛnea ɛnyɛ den sɛ wode bedi dwuma!
Dɛn ne Thermoplastic?
Thermoplastic yɛ ade a wɔde kyekyere nneɛma bom. Ɛyɛ polymer (aduru a ɛkyekyere) ne plastic bi a ɛyɛ mmerɛw sɛ ɛyɛ hyew na ɛyɛ den bere a ɛyɛ nwini. Eyi ma ɛyɛ ade kɛse a wɔde abo sisi agude mu! Ɛnyɛ sɛ thermoplastic bɛma abo no akɔhyɛ baabi a ɛhɔ yɛ den nko, na mmom ɛma ɛyɛ mmerɛw sɛ wɔde nneɛma no bɛyɛ adwuma. Ne titiriw no, wubetumi anwene wo nneɛma, de akɔ baabi foforo, na woayɛ no foforo kosi sɛ ɛbɛyɛ sɛnea wususuw ho no pɛpɛɛpɛ.
Nneɛma pii wɔ hɔ a wobetumi apaw de ayɛ thermoplastic, nanso abien a agye din sen biara wɔ agude a wɔyɛ mu ne:
- Jett Mfitiaseɛ Fixturing Compound a Rio Grande yɛeɛ
- Thermo-Loc a GRS na ɛyɛe
Sɛ wonya wo thermoplastic no wɔ wo nsam wie a, akwan pii wɔ hɔ a wobɛfa so de adi dwuma — efi abo a wode bɛbɔ ho ban so kosi w’agude ade no nsusuwii a wobɛbɔ ho ban so.
Fa Thermoplastic Di Dwuma Fa Boa Wɔ:
Abo a wɔde besisi agude mu
Adwuma a wobɛkura mu yiye bere a woretutu fam no
Pendant, bracelet asinasin, asomuade anaa base metal a wɔde bɛkyekyere no wɔ nea ɛwɔ hɔ
Wɔde si benkyi bi mu sɛnea ɛbɛyɛ a ɛbɛyɛ mmerɛw sɛ wobɛkɔ hɔ
Tew wosow no so na amma mfomso biara amma
Aboɔden abo a wɔde besisi nneɛma nketenkete te sɛ nkaa ne asomuade mu
Supporting shape of the jewelry item sɛnea ɛbɛyɛ a ɛrensɛe bere a ɛresi hɔ no
Sɛnea wubetumi asusuw ho no, saa nneɛma yi ma thermoplastic yɛ ade a eye kyɛn so a wɔde si abo. Sɛnea wubetumi de thermoplastic adi dwuma de abo ahyɛ agude mu ni.
Sɛnea Wɔde Thermoplastic Di Dwuma Wɔ Abo a Wɔde Sisi Mu
Woasiesie wo ho sɛ wode thermoplastic bɛhyɛ w’abo no mu? Anamɔn biara akwankyerɛ a ɛbɛkyerɛ wo wɔ adeyɛ no mu ni. Wubetumi de kɔnmuade a wɔde kyekyere, asomuade dade, nkapo, ne dade ahorow nyinaa a wɔde hyɛ mu akyekye thermoplastic ho. Wɔ saa nhwɛsoɔ yi mu no, yɛbɛkyerɛ wo sɛdeɛ wobɛkyekyere asomuade a wɔde ahyɛ mu wɔ thermoplastic mu de ayɛ aboɔden aboɔ. Nanso, ɛnyɛ den sɛ wubedi anammɔn yi akyi ama dade biara a woayɛ nhyehyɛe sɛ wode bɛbɔ aboɔden abo ho.
Anamɔn 1 - Fi ase de Nsu a Ɛrenoa
Hwie nsu a ɛyɛ hyew gu ahwehwɛ toa anaa kuruwa mu. Ɛyɛ papa sɛ wobɛkwati sɛ wode plastic ahina a ɛnyɛ den sɛ ɛbɛbɔ na abata ade no nkyɛnkyɛn bedi dwuma.
Anamɔn 2 - Fa Thermoplastic no ka ho
Hwie thermoplastic beads fitaa tablespoons 1-2 gu nsu a ɛyɛ hyew no mu. Bere a wɔde bɛyɛ sikɔne 20 ahyɛ nsu mu akyi no, thermoplastic beads no bɛyow ayɛ no blob a ɛyɛ mmerɛw. Sɛ wotwe fi nsu a ɛyɛ hyew no mu a, ɛbɛyɛ hyew, enti hwɛ yiye na woanhyew wo ho. Sɛ ɛboa a, wubetumi de nsenia akura blob no mu sen sɛ wode wo nsateaa bɛkura mu.
Anamɔn 3 - Yɛ Nkuku
Sɛ thermoplastic no yɛ nwini a wubetumi adi ho dwuma wie a, fa wo nsa nwene no ma ɛnyɛ bɔɔl, afei pia ne nnyinaso ma ɛnyɛ T. Ɛsɛ sɛ nsusuwii no yɛ tẽẽ na ɛne ne ho di nsɛ. Wubetumi de wet ring clamp ayɛ crimp out tẽẽ bi a ɛteɛteɛ thermoplastic no ase.
Anamɔn 4 - Hyɛ Nkuku no den
Afei, fa thermoplastic nkuku no gu nsukyenee nsu mu na ama ne nsusuwii no ayɛ den. Sɛ ɛyɛ fɛ na ɛyɛ den wie a, yi fi nsukyenee nsu no mu. 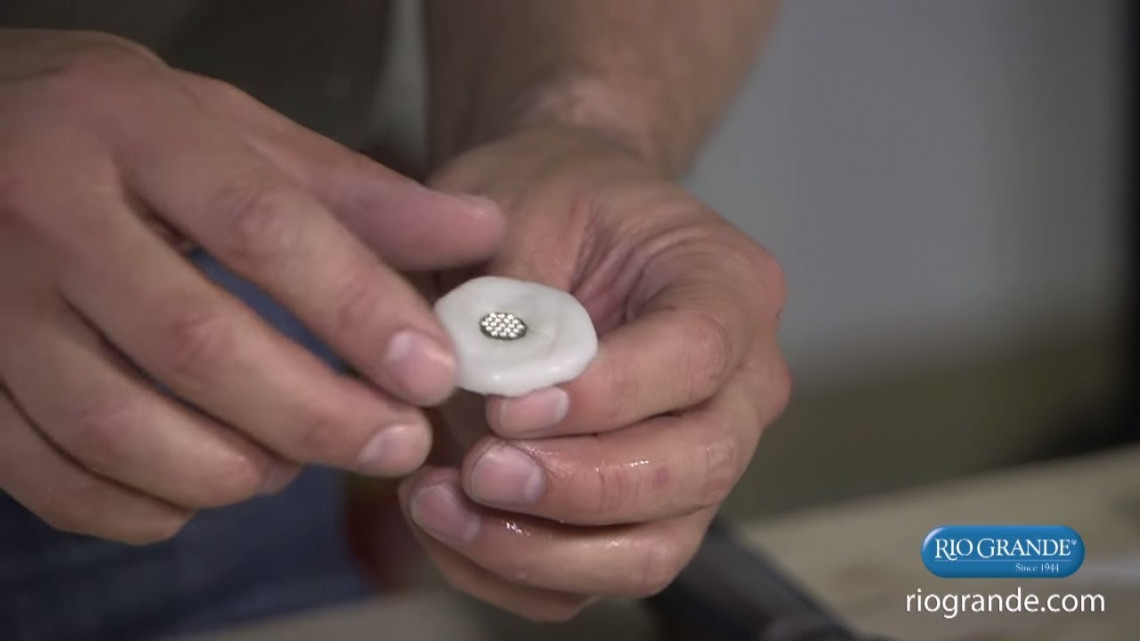
Anamɔn 5 - Fa Pendant anaa Base Metal no bɔ ho ban
Fa wo thermoplastic no kura T no mu, na fa asinasin no ase brɛoo hyɛ nsu a ɛyɛ hyew no mu bio sikɔne kakraa bi. Sɛ nnyinaso no yɛ mmerɛw wie a, wubetumi ayi thermoplastic no na afei wode w’asomuade a wɔde ahyɛ mu no abɔ thermoplastic no ase. Fa wo nsateaa di dwuma fa thermoplastic no nnyinaso twa pendant no ano ho hyia ma ɛkyekyere no yiye. Ɛsɛ sɛ wɔde pendant no anoano yɛ flush to thermoplastic no, na wɔhwɛ yiye na ɛnhyɛ pendant no so. Ne titiriw no, wopɛ sɛ pendant no ne thermoplastic nnyinaso no yɛ pɛ.
Anamɔn 6 - Dunk a Etwa To Baako
Sɛ pendant no hyia pɛpɛɛpɛ tratraa thermoplastic no a, wobɛtow ahyɛ nsuonwini no mu pɛnkoro bio simma 10-20.
Anamɔn 7 - Fa Aboɔ no ka ho
Seesei woasiesie wo ho sɛ wode abo no bɛka ho! Fa thermoplastic no hyɛ ring clamp anaa fastening adwinnade a wopɛ mu na fi ase de wo aboɔden abo no ka ho. Wobɛhyɛ sɛnea ɛyɛ mmerɛw kɛse sɛ wode thermoplastic no besisi abo no nsow. Sɛ wuwie a, ɛho behia sɛ wuyi wo pendant no fi thermoplastic no mu.
Sɛ wohyehyɛ w’abo no wie a, wubetumi asiesie anaasɛ wubetumi asan de thermoplastic nkuku no adi dwuma bio. Sɛ wopɛ sɛ woyɛ nkuku foforo a, fa thermoplastic no san hyɛ nsu a ɛyɛ hyew mu kɛkɛ, na ɛno bɛma ayɛ mmerɛw na ama woatumi asan ayɛ nkuku foforo.
Woasiesie Wo Ho sɛ Wobɛhohoro Wo Ho?
Seesei a wunim sɛnea wode thermoplastic di dwuma de si abo no, bere aso sɛ wuyi pendant no na wosiesie. Awiei koraa no, wobɛsan ayɛ anammɔn koro no ara a wode kyekyeree pendant no wɔ thermoplastic no ho no, na woayɛ nsakrae nketenkete. Ɔkwan a wɔfa so yɛ no ni:
Hwie nsu a ɛyɛ hyew gu kuruwa mu na fa thermoplastic no gu aguaree a ɛyɛ hyew no mu simma kakraa bi. Fa tongs yi thermoplastic no, a ɛsɛ sɛ ɛyɛ malleable sɛnea ɛbɛyɛ a wobeyi pendant no. Nea ɛyɛ awerɛhow no, nkae bi bɛbata pendant no ho, na wubetumi de aduru a wɔde sew sẽ ayi afi hɔ. Kɔ so fa pendant no gu nsu a ɛyɛ hyew no mu kosi sɛ wobeyi thermoplastic no nyinaa afi hɔ koraa.
Ná ɛno nyɛ den saa, ɛnte saa? Sɛ wode thermoplastic yɛ adwuma a, ɛyɛ ɔkwan a ɛnyɛ den sɛ wobɛfa so ayɛ adwuma yiye. Ade kɛse a ɛwɔ saa ade a ɛyɛ mmerɛw yi ho ne sɛ ɛma wutumi de w’agude ho mfonini ahorow no ba nkwa mu a ɛnyɛ den! Sɛ wo mfonini ahorow no de nneɛma a wɔde siesie fie te sɛ nhwiren ne aboɔden abo ka ho kɛse a, akyinnye biara nni ho sɛ wobɛpɛ sɛ wode akwankyerɛ yi sie wo nsam!
SHOP FOR JEWELRY HO NSƐM


搜尋Fashion Encyclopedia
相關拍賣


相關文章
Sɛnea wobɛtɔ ruby ama wo ring anaa pendant,Hwɛ sɛ wubesua pii sɛnea wubetumi afa Rubies ho, ansa na woatɔ ring anaa setting a worekɔ de Rubies aka ho. Te sɛ Diamonds no, Rubies betumi ayɛ nea mfomso wom, na ɛnyɛ pɛ Ruby no yɛ nea b
10th Apr 2019
Dɛn Nti na Mepaw Saa Ayeforohyia Nkatabo Yi?
10th Apr 2019
Akwankyerɛ bi a ɛfa Opals a ɛnyɛ den a wobɛtɔ ama Jewelry ho. Doublets ne Triplets yɛ pɛpɛɛpɛ ma Jewelry ne nanso nneɛma bi wɔ hɔ a ɛsɛ sɛ wohwɛ yiye.
3rd Oct 2019
最新的文章
Titanium yɛ agude dade a agye din a wonim no sɛ emu yɛ hare, ɛyɛ den, na ne bo nyɛ den. Sua titanium ho ade nyinaa, sɛnea wɔde toto dade a ɛte saa ara ho, ne mfaso ne ɔhaw ahorow a ɛwɔ titanium agude so.
7th Feb 2023
Sua tungsten agude ho ade nyinaa - efi n'abakɔsɛm ne sɛnea wɔde di dwuma so kosi ne kyɛ ne ne hwɛ so. Edu yɛn akwankyerɛfo no awiei a, wubehu sɛ tungsten fata wo anaa!
7th Feb 2023
Woresusuw ho sɛ wode sika kɔkɔɔ fitaa agude bi a bere ntumi nsɛe no bɛka wo nneɛma pa a woaboaboa ano no ho? Nea ɛsɛ sɛ wuhu fa sika kɔkɔɔ fitaa a ɛyɛ nwonwa ho nyinaa ni!
29th Jan 2023