
Veröffentlicht am 14th Jul 2020
Geändert am 22nd Feb 2021
So stellen Sie eine Münzkette her: Eine vollständige Anleitung
 Seit jeher tragen Männer und Frauen Münzschmuck, um ihren sozialen Status und Reichtum zu signalisieren. Die Schmuckstile können sich von Kultur zu Kultur unterscheiden, aber Münzen als Dekoration sind immer vorhanden. Möchten Sie Ihrem Look einen Hauch von Noblesse verleihen? Warum lernen Sie nicht, wie man eine Münzkette herstellt?
Im viktorianischen Zeitalter schenkten Seeleute ihren Liebsten gravierte Münzen zur Erinnerung, bevor sie sich auf gefährliche Reisen begaben. In dieser Zeit vor Voicemail, Textnachrichten und sozialen Medien boten diese Liebesbeweise – gewöhnliche Münzen mit eingravierten sentimentalen Botschaften – Paaren, die in der Ferne lebten, greifbare Erinnerungen an ihre Verbundenheit.
Heutzutage gilt es für viele Menschen als Glücksbringer, eine Münze aus dem Jahr der Geburt bei sich zu tragen. Alternativ können Sie auch ein wichtiges Datum wie einen Schulabschluss oder eine Hochzeit wählen. Sind Sie großzügig? Warum schenken Sie Freunden oder Angehörigen nicht Münzen aus wichtigen Jahren ihres Lebens?
Möchten Sie bei diesem Trend mitmachen? Keine Sorge, Sie müssen nicht mit einem Seemann ausgehen oder Unmengen an Geld ausgeben, um zu lernen, wie man eine Münzkette herstellt. Es gibt zwei Methoden, und wir werden beide unten ausführlich behandeln. Lesen Sie weiter, während wir Sie durch den Prozess der Herstellung Ihrer ganz persönlichen Münzkette führen. Aber zuerst besuchen Sie unsere Münz-Website und finden Sie etwas Besonderes.
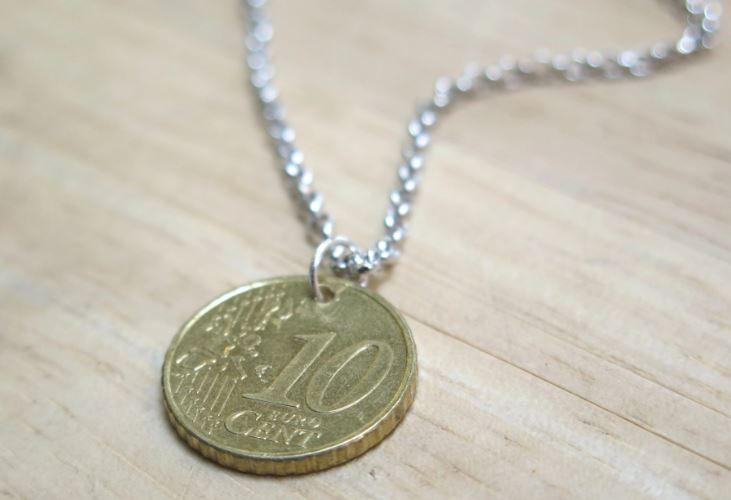
Methode Nr. 1: Wie man einen Münzhalskettenanhänger herstellt
Wenn Sie kürzlich in ein fremdes Land gereist sind und etwas von der Währung mitgebracht haben, ist dies eine großartige Möglichkeit, ein Andenken zu schaffen. Sind Sie vom Reisefieber gepackt? Beginnen Sie mit einer Münze und fügen Sie für jede Reise eine weitere hinzu! In ein paar Jahren werden Sie ein wunderschönes Schmuckstück haben, das Ihnen als Geschichtenbuch für Ihre Weltreisen dient.
Werkzeuge benötigt
Ihre Münze der Wahl
Bohrmaschine mit schlankem Bohrer
Ein Biegering
Spitzzange
Kette oder Band zum Aufhängen des fertigen Anhängers
Ein Block aus Holz oder Metall
Starkes Klebeband, wie Duct of Gaff Tape
Schritte zur Herstellung einer Münzkette
Schritt 1: Legen Sie das Stück Holz oder Metall auf eine flache Oberfläche. Dies dient als Barriere und schützt Ihre Arbeitsplatte oder Ihren Arbeitstisch vor dem Bohrer.
Schritt 2: Entscheiden Sie, welche Seite der Münze Sie zeigen möchten. Die meisten Münzen haben zwei Gesichter. Wählen Sie also die Seite, die Sie richtig herum zeigen möchten, da die Rückseite beim Umdrehen auf den Kopf gestellt sein kann.
Schritt 3: Wenn Sie sich entschieden haben, legen Sie die Münze mit der gewünschten Seite zu Ihnen auf den Block.
Schritt 4: Befestigen Sie die untere Hälfte der Münze mit einem Stück Klebeband, damit sie sich nicht bewegt oder verrutscht, wenn Sie mit dem Bohren beginnen.
Schritt 5: Sobald Ihre Münze gesichert ist, ist es Zeit, das Loch zu bohren! Keine Sorge, es ist nicht illegal, ein Loch in eine Währung zu bohren. Es versteht sich von selbst, aber wenn Sie versuchen, damit etwas zu bezahlen, nachdem Sie gebohrt haben, könnten Sie zum Gesetzlosen werden. Behalten Sie diesen Anhänger stattdessen zur Schau an Ihrer Halskette und nicht, um Ihren Kaffee zu bezahlen.
Schritt 6: Richten Sie den Bohrer auf die Mitte der Münze aus und los geht‘s! Drücken Sie fest, aber sanft nach unten und bohren Sie weiter, bis Sie spüren, wie der Bohrer auf das Holz trifft.
Schritt 7: Öffnen Sie den Biegering mit der Spitzzange. Führen Sie ihn durch das neu gebohrte Loch in Ihrer Münze und drücken Sie ihn dann zu. Wenn Sie keinen Biegering kaufen möchten, können Sie einen von einer alten Halskette klauen, die Sie nicht mehr verwenden. Recyceln, reduzieren, wiederverwenden!
Schritt 8: Fädeln Sie die Kette oder das Band durch den Biegering. Fertig! Sie haben Ihre ganz persönliche, individuell angefertigte Münzkette für einen Bruchteil des Preises, den Sie bei einem Juwelier zahlen würden.
Sie haben nun einen klassischen Münzkettenanhänger hergestellt und sind bereit, Ihrer Sammlung einen weiteren hinzuzufügen?
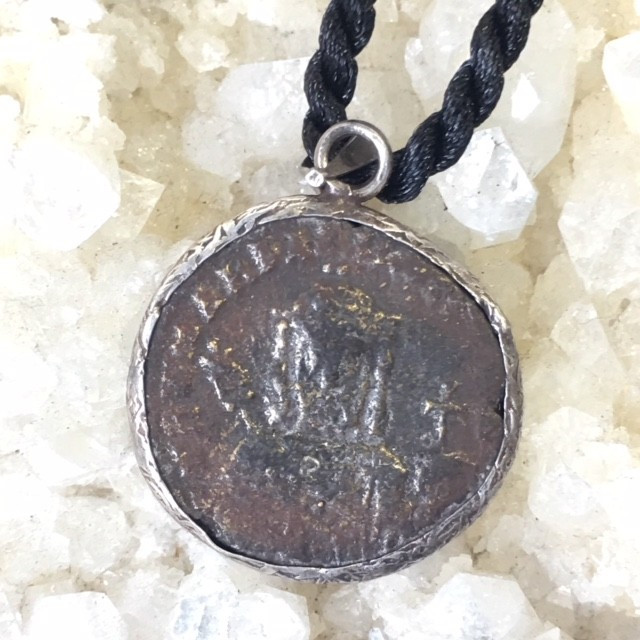
Methode Nr. 2: So stellen Sie einen Münzanhänger mit Lünette her
Wenn Sie nicht in Bundesgeld bohren möchten, aber trotzdem modisch aussehen möchten, ist dieses Tutorial genau das Richtige für Sie. Sie können einen schönen Münzanhänger herstellen, ohne irgendwo ein Loch zu bohren.
Werkzeuge benötigt
Ihre Münze der Wahl
Eine hängende Lünette
Ein kleiner Schraubendreher. Manche Blenden haben keine Schrauben und werden durch Biegen geöffnet und geschlossen. Wenn Sie eine dieser Blenden haben, brauchen Sie den Schraubendreher nicht.
Eine Halskette oder ein Band zum Aufhängen des Anhängers
Schritte zur Herstellung eines Münzanhängers mit Lünette
Schritt 1: Wenn Sie eine Lünette mit Schraubverschluss haben, nehmen Sie Ihren Schraubenzieher in eine Hand und halten Sie die Lünette in der anderen. Schrauben Sie die Oberseite vorsichtig ab, bis sich die winzige Schraube löst. Legen Sie sie an einen sicheren Ort. Lünettenschrauben sind so klein, dass, wenn sie auf den Boden rollen, die Wahrscheinlichkeit gering ist, dass sie aus dem Abgrund des Teppichs oder Läufers herausgefischt werden.
Schritt 2: Öffnen Sie die Lünette gerade so weit, dass die Münze in die Öffnung passt. Ziehen Sie die Seiten der Lünette vorsichtig auseinander, verdrehen Sie sie nicht. Andernfalls verbiegt sich das Metall und die Lünette behält nicht ihre ursprüngliche Form.
Schritt 3: Schließen Sie die Fassung und schrauben Sie den Verschluss wieder fest. Wenn sich Ihre Münze locker anfühlt und Sie befürchten, dass sie aus dem Anhänger fällt, ist das kein Problem. Öffnen Sie die Fassung einfach wieder und geben Sie ein wenig Sekundenkleber oder Epoxidharz an die Seite Ihrer Münze, bevor Sie sie wieder einsetzen.
Schritt 4: Fädeln Sie das Band oder die Kette durch den Anhänger und fertig. Keine Elektrowerkzeuge, kein Bohren und keine Unordnung.
Diese Methode eignet sich auch hervorragend, wenn Sie Münzsammler sind und einige wertvolle Stücke in Ihrer Sammlung haben, die Sie zur Schau stellen möchten. Wenn Sie die Münzen nicht in die Lünette kleben, können Sie sie austauschen, wann immer Sie Ihren Stil ändern möchten.
Zeigen Sie Ihre Münze!
Münzschmuck hat die Pharaonen des alten Ägyptens und des viktorianischen Englands überdauert und ist bis heute beliebt. Man kann mit Sicherheit sagen, dass dieser Trend so schnell nicht aus der Mode kommt!
Und jetzt sind Sie auf dem besten Weg, den Trend selbst zur Schau zu stellen. Mit diesen Werkzeugen und Anleitungen haben Sie alles, was Sie brauchen, um so viele fantastische Stücke zu kreieren, wie Sie möchten!
MÜNZEN KAUFENSuche nach Fashion Encyclopedia
Verwandte Auktionen


In Verbindung stehende Artikel
Warum ist Edelsteinschmuck so beliebt? Obwohl „es nichts Neues unter der Sonne gibt“, können alte Stile so gut wie neu wirken, und die Popularität von Vintage-Edelsteinschmuck hat dies bewiesen. Edelsteine werden von vielen Menschen am meisten geliebt, weil sie
10th Apr 2019
Warum Diamantschmuck so beliebt ist. Es ist kein Wunder, dass Diamanten schon immer der begehrteste Edelstein waren, der die Menschen durch ihre Pracht fesselt. Tatsächlich glaubten die Römer, dass Diamanten Partikel von Sternschnuppen sind, während die Griechen dachten
5th Mar 2020
Die Jewelers Manufactures Association (JMA) wurde am 11. November 2018 von verifizierten Verkäufern von Gem Rock Auctions gegründet, die die falsche Darstellung von Schmuck im Internet für Käufer minimieren wollten.
23rd Mar 2020
Neue Artikel
Titan ist ein beliebtes Schmuckmetall, das für sein geringes Gewicht, seine Langlebigkeit und seinen günstigen Preis bekannt ist. Erfahren Sie alles über Titan, wie es im Vergleich zu ähnlichen Metallen abschneidet und welche Vor- und Nachteile Titanschmuck hat.
7th Feb 2023
Erfahren Sie alles über Wolframschmuck – von seiner Geschichte und Verwendung bis hin zu seiner Haltbarkeit und Pflege. Am Ende unseres Leitfadens wissen Sie, ob Wolfram das Richtige für Sie ist!
7th Feb 2023
Sie möchten Ihre Sammlung edler Accessoires um zeitlosen Weißgoldschmuck ergänzen? Hier erfahren Sie alles Wissenswerte über edles Weißgold!
29th Jan 2023