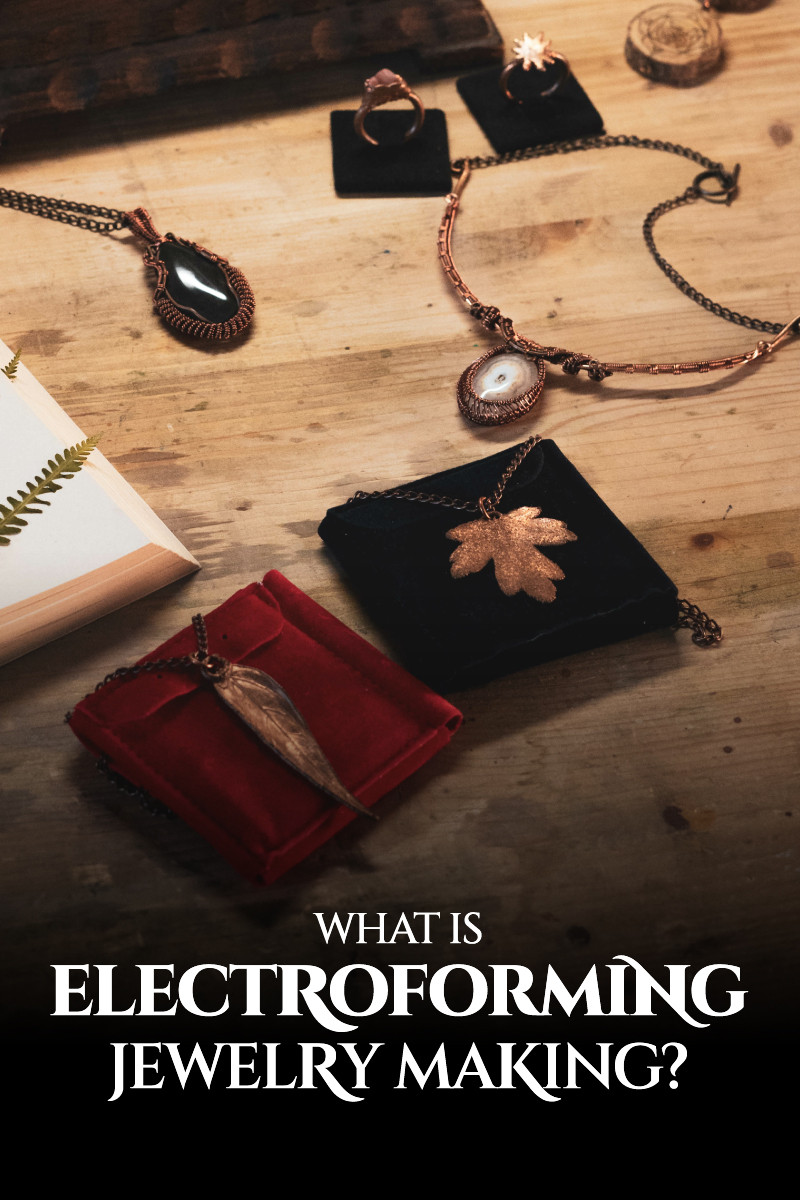
What Is Electroforming In Jewelry Making?
 Ever wish there was a way to turn your favorite natural elements into one-of-a-kind pieces of jewelry? Then it might be time to explore the world of electroforming jewelry-making.
There’s a good chance you’ve come across electroformed jewelry before and didn’t even know it. In these unique jewelry designs, raw metal edges envelop gemstones and organic materials.
But like any technique, electroforming takes skill, patience, and precision to perfect.
Are you ready to learn how to turn your cherished trinkets, treasures, and crystals into unique, eclectic jewelry you'll never want to take off?
Today, we’re taking an in-depth look at electroforming in jewelry-making and teaching you how to create your own wearable works of art!

What is Electroforming?
What is the purpose of electroforming? This innovative process creates unique, one-of-a-kind jewelry around natural materials and other unlikely mediums.
The free-form technique involves building layers of metal, typically copper, around a conductive surface using an electrical current. This conductive surface, or “form,” can be made of almost anything — wax, plastic, gems, or even organic materials like leaves, seashells, pine cones… the list goes on.
The form is then coated with a conductive material and dipped into a metallic ion solution. Electricity is applied, causing the metal ions to deposit onto the form and create a metal layer.
The final product is a perfectly preserved 3D object ready to be cleaned, polished, and worn as an extraordinary piece of jewelry!
As for how strong electroforming is, you can repeat the process to build up thickness and strength. You can also make electroformed jewelry stronger by choosing different metals. For instance, copper is relatively soft, so electroformed jewelry made from copper may not be as strong as jewelry made from harder metals like gold or silver alloys.
On that note, what metals can you electroform?
Copper Electroforming
You can electroform just about any metal; however, copper is the most popular for electroforming jewelry-making.
During copper electroforming, low-voltage electricity causes copper particles to come off the anode (which conducts electricity) and pass through the electroforming solution. The particles then attach to the item suspended in the solution.
When you electroform with something other than copper, the solution has particles of the metal suspended, which attach to your piece. With copper, however, the metal particles come from the anode (the copper wire inside the beaker).
So how did this innovative jewelry-making process get its start?
 Pictured above: Cup with cover, 19th century after 1611-12 original; Medium: Electroformed copper, gilt; | Image credit: Metropolitan Museum of Art
History of Electroforming Jewelry-Making
Electroformed jewelry started in the late 19th century. Prussian-Russian physicist, Moritz Hermann Jacobi, is credited with inventing the process.
At first, electroforming was mainly used to reproduce sculptures, copper engravings, and other artistic works across England, France, and Germany.
It wasn’t long before European jewelers started incorporating electroforming in jewelry-making, which became widely adopted around the early 20th century.
Over the years, designers have continued to test the boundaries, and electroforming jewelry-making developed even further — allowing for the use of new metals and unique mediums.
Today, it remains a popular technique for creating jewelry with an organic, raw aesthetic that art and studio jewelers particularly love.
Going back to the present, how is electroforming different from electroplating?
Is Electroforming the Same Thing As Electroplating?
It’s a common misconception that electroforming and electroplating are the same. While the names and processes are similar, the techniques function slightly differently.
What equipment do you need for electroplating vs. electroforming? Both processes require similar materials: a base form, a metal, a rectifier (to conduct electrical current), beakers, a plating solution, and a power supply.
The notable difference is each process’s end-product. Electroforming creates a thick copper coating over an item, while electroplating adds a small metal plating to another metal.
But does that mean electroplated gold isn’t real gold? Technically the plated layer is real gold, but because of how little gold is actually used, gold-plated jewelry doesn't hold the value of solid gold.
Electroforming, on the other hand, is the primary design element of the piece. Most often, copper is the primary feature of the jewelry. Additionally, electroplating jewelry involves various metals, while electroforming mainly uses copper.
With that knowledge in mind, are you ready to try your hand at electroforming jewelry-making?

How to Electroform Jewelry
It’s easy to feel intimidated by electroforming. It requires special equipment, technical know-how, electricity, and electrodes — cue the junior high science fair flashbacks.
While it might sound like a complex scientific process, we promise you don’t need a lab coat or chemistry degree to master this skill. In fact, electroforming is more akin to a fun craft project than a science experiment!
First things first, let’s go over what you’ll need.
List of Supplies For Electroforming Jewelry-Making
To start electroforming, you’ll want to gather the following materials:
A Base Form
You first need your ideal base form like a gem or treasure you want to transform into jewelry, like a leaf or shell — whatever your heart desires!
Rubber Gloves and Eye Protection
Wear properly fitting, rubber-insulator gloves to protect your hands from exposure to chemicals and electrical currents. Be sure to wear eye protection and work in a clean, well-ventilated area, as well.
Copper Anode
Next, you’ll need the key ingredient for giving these jewelry pieces their appeal: copper sheets.
Copper Electroforming Solution
This liquid is a bonding agent for sealing the copper sheets to your base form.
Copper Wire
You need a copper wire to hold your base item and submerge it into the beaker for electroforming. A 22-gauge copper wire works best.
3-Amp Rectifier
You’ll need this for powering the electroforming jewelry-making process, but it’s best to get a rectifier that lets you customize the volts and amps.
Lacquer
This paint helps protect your organic materials from acidic damage via the electroforming solution.
Copper-Conductive Paint
You’ll apply this metallic, conductive paint where you want to build the electroformed copper.
1,000 mL Beaker
This beaker will hold the solution, jewelry piece, and copper wire and act as the bath for the electroforming process.
Positive And Negative Leads
These connect the rectifier to the copper.
Tongs or tweezers
Use tongs or tweezers to help you lower the items into the beaker.
Magic Sculpt (optional)
Certain designs require this two-part epoxy clay to create a base for your jewelry piece.
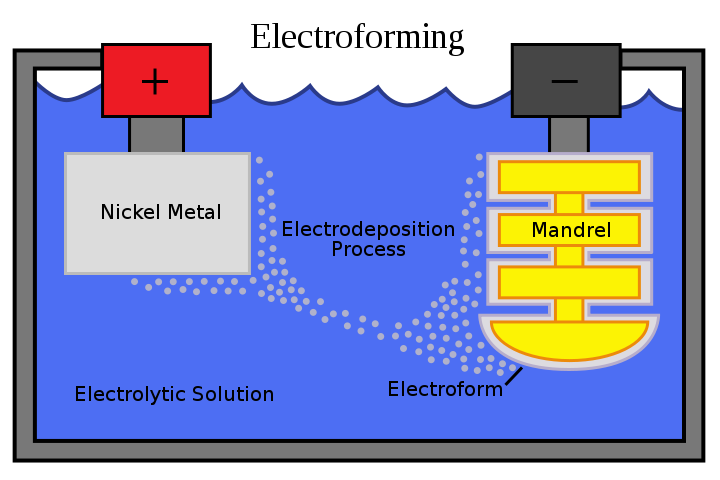 Image credit: Maestro Sargento (original); Pbroks13 (redraw) | Creative Commons Attribution-Share Alike 3.0 Unported license
Preparation Steps for Electroforming Jewelry-Making
Supplies? Check. Design? Check. Now get your safety gear on, and let’s get started!
Step 1: Seal your base form.
First, seal your gem (or other base form) with lacquer to protect it from acid damage. Let the paint dry thoroughly (~24 hours) before moving forward.
Step 2: Create a base.
If you’d like your jewelry piece to have a base, like in a ring or pendant, here’s where you’d use the two-part epoxy clay to create it. Combine the resin and hardener according to the product instructions. Create your base and fasten your form item. Leave it for 24 hours until it’s completely hard.
Step 3: Apply conductive paint as needed.
Apply conductive paint on the area you want to electroform. Make sure it’s thoroughly mixed to avoid streaks or uneven application. Let dry for another day.
The copper-conductive paint areas must be interconnected, otherwise, you’ll leave parts of the piece exposed without the copper plate.
Step 4: Suspend your piece into the beaker.
Place your (fully dried) painted piece into the empty glass beaker. Wrap it with copper wire to prevent it from falling in, but avoid completely covering the conductive copper paint. Use tongs to wrap the copper wire and slide it into the beaker.
 Image credit: Encyclopædia Britannica
Electroforming Steps
Step 5: Apply the copper anodes.
After cleaning your copper anodes (or copper sheets), drill holes into the top two strips and attach them to a new copper wire (not the one wrapped around the base). Then, put them in the beaker.
For context, this new copper wire is what you'll use to connect to the positive power, while the wire around the base deposits the metal ions onto the surface of the base form.
Step 6: Add the electroform solution.
Slowly pour the solution into your beaker until the item is completely submerged.
Step 7: Clip the wire leads.
With the rectifier turned off, connect the negative (black) wire to the cathode and the red (positive) wire to the anode.
Step 8: Get electric!
Set the rectifier at 0.1 to start, which allows for 0.1 voltage per square inch of surface. After 30 minutes, check to see if you need to adjust your amps. Leave it for 10 to 24 hours.
Last Step: Remove, polish, and wear!
When your piece reaches the desired thickness, shut off your rectifier, unclamp the lead wires, and remove the item from the solution.
Rinse your jewelry item in water and polish it to enhance the copper’s shine.
Now you have some truly unique electroform jewelry to wear!
That's it! Not scary, not dangerous, and with some practice, you’ll be on your way to mastering electroforming jewelry-making in no time!

Advantages of Electroforming
If you still aren’t convinced about learning how to electroform, these benefits might change your mind.
So what are 5 advantages of electroforming?
You can create beautiful, high-quality jewelry and wearable art.
You have more consistency and precision in the final product.
Not many people do it, making this a rare jewelry-making technique.
Electroformed jewelry does last many years because it’s very durable.
Electroforming is an eco-friendly production process.
On the flip side….
Limitations of Electroforming
Here are a few disadvantages worth noting:
The cost of equipment and materials to get started can be costly.
It’s a time-consuming process that requires lots of patience.
There is a risk of damaging delicate base materials.
It takes practice to perfect electroforming jewelry-making.
Electroform jewelry does sometimes tarnish because it’s made of copper.
Think we might have missed something? Our FAQ section has you covered.
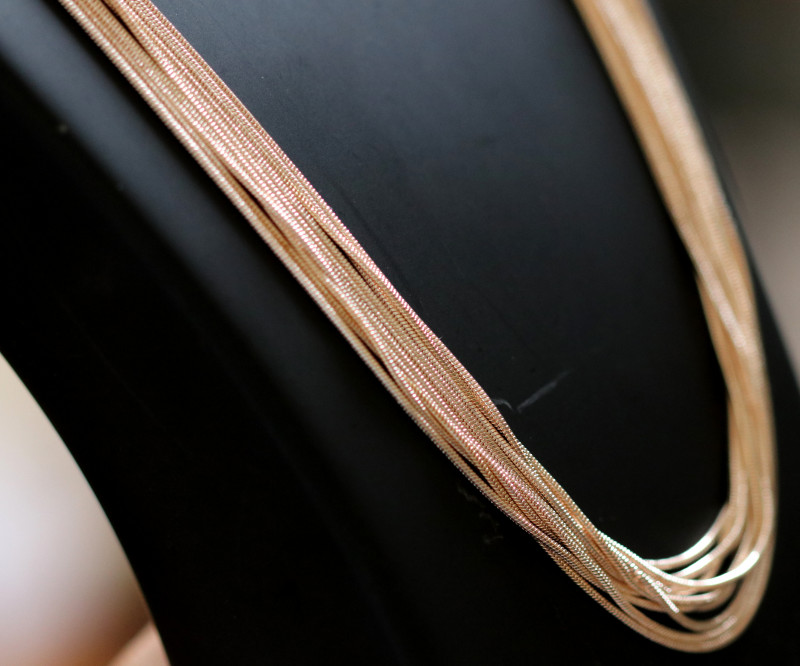 Pictured above: Ten dual snake chain necklaces of rose gold-electroformed stainless steel
Frequently Asked Questions
Below, we’ve answered some of the most common questions about electroform jewelry:
How long does it take to electroform a ring or pendant?
That depends! The electroforming process takes anywhere from several hours to several days, depending on how thick a coating you want your jewelry piece to have.
Is electroforming sustainable?
Electroform is considered a somewhat sustainable practice because you recycle old items or gems into jewelry (rather than throwing them out).
What is 24k gold electroform?
24k gold electroform is a special technique for improving the hardness and wear resistance of 24k gold jewelry. You can also use it to replace the copper solution in the typical electroform practice.
What is 14 karat gold electroform?
14k gold electroform is when 14k gold replaces the copper solution — making stronger, sturdier, and more valuable jewelry pieces.
How do you care for electroformed jewelry?
It’s best to treat electroformed jewelry like any other delicate jewelry. Some key things to keep in mind are:
Remove your jewelry before swimming, bathing, or any rigorous activity
Avoid your jewelry coming into contact with harsh chemicals or cleaners
Store in a cool, dark place away from humidity and prolonged sun exposure
Clean and polish your electroformed jewelry regularly to maintain its luster
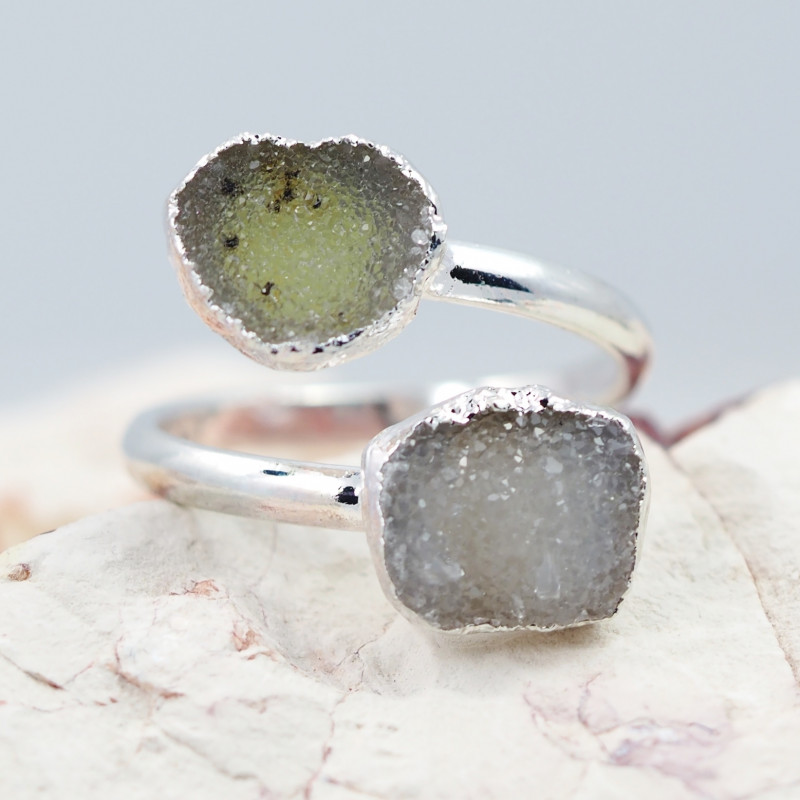
Preserve Your Treasures with Electroforming Jewelry-Making
The way electroforming beautifully encompasses gems and organic material, creating exceptional jewelry pieces, is truly magical. After all, what better way to preserve your favorite treasures than to transform them into one-of-a-kind wearable works of art?
With a bit of patience, practice, and lots of imagination — there are no ends to the unique jewelry you can create via electroforming jewelry-making.
And if you don’t feel like taking on a new hobby, don’t worry! We’ve got you covered with artfully-crafted electroformed jewelry ready to make a home in your collection!
Browse our stunning selection of electroformed jewelry today!


Was this article helpful?


Ross Sedawie
- Written - 7th Oct 2020
- Edited - 18th Feb 2023
Ross Sedawie
- Written - 7th Oct 2020
- Edited - 18th Feb 2023
Related Auctions


Related categories Fashion Jewelry Sets, Fashion Jewelry and Wholesale Bulk Jewelry
Related Articles
-
How Is A Pickle Pot For Jewelry Making Used?
22nd Feb 2021Jewelers have countless tools in their arsenal from conventional jewelry...
-
The Best Jewelry Making Books For Beginners
15th Sep 2023Are you passionate about all things diy do you also...
-
How to Prepare Your Solder For Jewelry-Making
22nd Feb 2021Making jewelry is an exciting venture whether you re a...
-
Jewelry Top Sellers & Jewelry Trends
7th Jun 2023The gemstone jewelry market experiences trends and changes can occur...
-
Buy Discount Jewelry Not Cheap Jewelry
7th Jun 2023Buy discount jewelry not cheap jewelry might sound like a...
Latest Articles
-
Nose Rings: Meanings, History & Significance
9th Apr 2024Nose piercings like nose rings and septum piercings have become...
-
How Much Does It Cost To Resize A Ring?
9th Apr 2024Does your ring need to be resized while ring resizing...
-
3D Shopping Opal and Gemstone Jewelry
2nd Apr 20243d image tv screens without 3d glasses have already been...
-
Rose Gold vs Yellow Gold - The Ultimate Buyer’s Guide
21st Mar 2024If you ve followed style trends you ve likely noticed...
-
Ring Options That Do Not Feature a Diamond
21st Mar 2024When looking for a ring that has a main stone...


